準備
◆Arduino IDE (PCにインストール無料)
◆Arduino Uno(ピンヘッダー同梱) (360円+送料170円)
◆Arduino IDE と Arduino Uno をつなぐUSBケーブル(100円+送料170円)
◆LCDモジュール キット (390円+送料170円)
工作開始
◆LCDにピンヘッダーをはんだ付けする
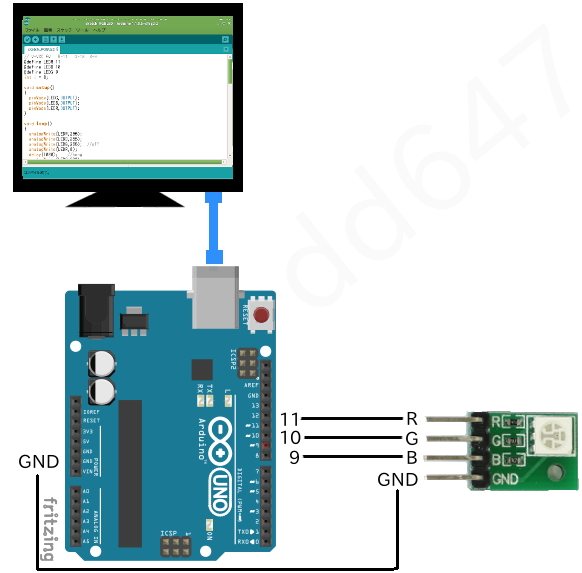
◆全てつなぎます。
◆選択する
(マイコンボード)
(シリアルポート)Arduinoがつながっているポート
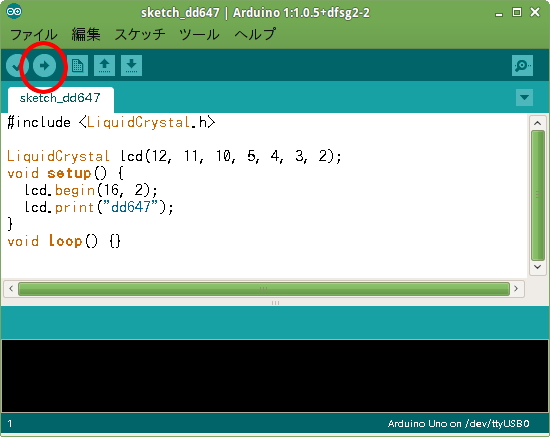
◆Arduinoソフトにスケッチを書く
#include <LiquidCrystal.h>
LiquidCrystal lcd(12, 11, 10, 5, 4, 3, 2);
void setup() {
lcd.begin(16, 2);
lcd.print("dd647");
}
void loop() {}
◆Arduinoハードにスケッチを書き込む
例2) example2
◆全てつなぎます。
◆Arduinoソフトにスケッチを書く
/*
LiquidCrystal Library - Autoscroll
Demonstrates the use a 16x2 LCD display. The LiquidCrystal
library works with all LCD displays that are compatible with the
Hitachi HD44780 driver. There are many of them out there, and you
can usually tell them by the 16-pin interface.
This sketch demonstrates the use of the autoscroll()
and noAutoscroll() functions to make new text scroll or not.
The circuit:
* LCD RS pin to digital pin 12
* LCD Enable pin to digital pin 11
* LCD D4 pin to digital pin 5
* LCD D5 pin to digital pin 4
* LCD D6 pin to digital pin 3
* LCD D7 pin to digital pin 2
* LCD R/W pin to ground
* 10K resistor:
* ends to +5V and ground
* wiper to LCD VO pin (pin 3)
Library originally added 18 Apr 2008
by David A. Mellis
library modified 5 Jul 2009
by Limor Fried (http://www.ladyada.net)
example added 9 Jul 2009
by Tom Igoe
modified 22 Nov 2010
by Tom Igoe
modified 7 Nov 2016
by Arturo Guadalupi
This example code is in the public domain.
http://www.arduino.cc/en/Tutorial/LiquidCrystalAutoscroll
*/
// include the library code:
#include <LiquidCrystal.h>
// initialize the library by associating any needed LCD interface pin
// with the arduino pin number it is connected to
const int rs = 12, en = 11, d4 = 5, d5 = 4, d6 = 3, d7 = 2;
LiquidCrystal lcd(rs, en, d4, d5, d6, d7);
void setup() {
// set up the LCD's number of columns and rows:
lcd.begin(16, 2);
}
void loop() {
// set the cursor to (0,0):
lcd.setCursor(0, 0);
// print from 0 to 9:
for (int thisChar = 0; thisChar < 10; thisChar++) {
lcd.print(thisChar);
delay(500);
}
// set the cursor to (16,1):
lcd.setCursor(16, 1);
// set the display to automatically scroll:
lcd.autoscroll();
// print from 0 to 9:
for (int thisChar = 0; thisChar < 10; thisChar++) {
lcd.print(thisChar);
delay(500);
}
// turn off automatic scrolling
lcd.noAutoscroll();
// clear screen for the next loop:
lcd.clear();
}
◆Arduinoハードにスケッチを書き込む
3.3VでもLCD表示しました。
写真Arduinoは実際の物とは違います。
可変抵抗(Variable resistance)で調整しないとうまく表示されません
PCがArduinoを認識しなかったり、スケッチでエラー出たり、写らなかったり苦労しました
本ブログを使用したことによる損害、損失については一切補償しません。